Articles
Guitar Maintenance Fundamentals - Part 1: Introduction
Welcome to the first article in my new series on basic guitar maintenance fundamentals.
As guitar players, we spend countless hours honing our playing skills, but few of us take the time to learn the basics of how to maintain our instruments. Instead, we delegate this task to a professional luthier/technician, or we just don't really do it all, at least until something completely breaks and we have no choice but to take it to a shop. I played guitar for decades before I ever bothered to learn to maintain my guitar beyond changing the strings.
The purpose of this series is to attempt to equip guitar players with some of the basic skills needed to maintain their guitars, focusing on the tasks that you may want to do fairly frequently, and which will save you a pile of cash in the long run, especially if you have multiple guitars to maintain.
As a builder of electric guitars, I tend to focus on electric guitars, but I will touch on acoustic guitars now and then.
To start this series, I want to cover just a few high-level topics that I feel every guitarist should understand.
Changing Strings
You likely know how to change your strings. But, if you're like most guitarists, you change them one at a time because at some point somebody probably told you that you're never supposed to take all of the strings off your guitar all at once. Maybe you've never heard that, but in my experience, most guitarists have heard it at some point in time. And most (including myself for many years) believe it to be true. I was told, way back when I was a teenager, that removing all of the strings could warp the neck. Maybe you heard some other variation on this idea. Whatever the specific details of what danger could occur, the basic idea was always that the guitar cannot be without strings for any length of time.
So let me begin by just saying that this is completely false. There is nothing wrong with removing all of the strings from your guitar, and even leaving it like that for an extended period of time. In fact, if you take your guitar in to a professional for a setup, I assure you that she or he will remove all the strings from your guitar, and your guitar will remain stringless for a while. And yet, no neck warpage will occur. The thing to remember is that your guitar's neck is made from a piece of wood, often maple or mahogany. That piece of wood came from a tree. And that tree spent years or decades without guitar strings stretched across it. And it did just fine. It didn't twist and turn and warp in weird angles, just desparate for someone to put some string tension on it to keep it straight.
Don't worry about removing all the strings. I do it all the time, and so should you, because it will give you a chance to do things you wouldn't otherwise get to do, like thoroughly cleaning your fingerboard, getting all that gunk out that tends to build up next to your frets. Or maybe even "conditioning" your fingerboard. And on that note...
"Conditioning" Your Fingerboard
There is much talk in guitar player circles about how often to condition your fingerboard, what product to use, and how much. Conditioning generally involves rubbing some kind of oil into the wood. Many companies sell products for this purpose, and those companies tend to recommend frequent conditioning, such as during every string change. Of course, the more frequently you condition your fingerboard, the more of their product you will need to spend your money on. So they're perhaps not the most impartial judges of your specific needs.
Everybody has their own opinion about how often to do it... and what follows is simply my own opinion, but one that came about after much research. My opinion is this: you probably do not need to "condition" your fingerboard very frequently, or even at all.
I got my first acoustic guitar sometime in the late 70s, my first electric guitar in the late 80s, and my second electric guitar in the early 90s. I've never oiled the fingerboards on any of them. They're fine.
I hear guitarists all the time talk about how "dry" their fingerboard looks. That's because it is dry, and that's intentional. When building a guitar, we use wood that has a moisture content of around 6% to 9%, which is pretty dry. If the wood is too wet, it will shrink over time. If it's too dry, it will expand when exposed to moisture. But wood that starts out in the range of 6% to 9% will generally stay in that range throughout years of normal usage.
This is true for all the wood in your guitar: the body, the neck, and the fingerboard. But it's most noticeable on the fingerboard because fingerboards generally do not have a finish on them (unless they're lacquered maple -- more on that below). When you spray a clear lacquer on a neck, you end up with a bright, shiny, blonde wood. But a rosewood fingerboard with no lacquer on it tends to look a bit dull, boring, and dry. But it's no drier than any other wood in your guitar. It just looks drier.
So the one benefit you do get out of oiling the fingerboard is that it gives it that brighter, "wet" look, similar to the look of having lacquer on it. If you prefer that look, then go ahead, oil your fingerboard. But it's purely an aesthetic choice, not a maintenance necessity.
As for the product to use, as I mentioned earlier, there are many companies selling products for this purpose, but honestly, mineral oil is all you need. Linseed oil works, too. You'll hear guitarists talk about using "lemon oil", but that's just mineral oil with a lemon scent added to it. So unless you just can't possibly shred without that lemon scent emanating from your fingerboard, then mineral oil is good enough. But the most important part is how much to use, and the answer to that is: very, very, very little. Like, almost none. Remember, all you're going for here is a slightly richer colour. What you don't want is greasy hands and strings, which is hard to avoid when you're literally rubbing oil on your fingerboard for purely aesthetic reasons.
I mentioned earlier that maple fingerboards generally have a lacquer finish on them. Therefore, maple is the one fingerboard that you would never want to oil. It already looks shiny and bright. Just keep it clean!
Cleaning Your Fingerboard
The first step to a clean fingerboard is to try to prevent it from getting dirty in the first place. Wash your hands before playing, and wipe your strings with a dry towel after playing.
Even doing this, it will still get dirty after a while. If you get a build up of gunk next to the frets (and assuming your fingerboard is not lacquered maple, which you do not want to scrape with anything), you'll want to scrape that away. The edge of an old credit card or similar makes a great gunk scraper. If you're particularly brave, a razor blade placed perpendicular to the board also works, but this takes a little practice to do without leaving tiny slice marks in the wood. After that, probably the best product to use is naptha (lighter fluid). Just put a little drop on a rag or bit of paper towel and wipe the wood clean. You don't need much.
Conclusion
That's all for this article. There's more to come, so check back soon!
Guitar Maintenance Fundamentals - Part 2: Intonation
Let's talk about intonation. I've found that many, or even most, guitarists do not understand intonation: what it is, why it needs adjustment, or how to adjust it. In this article, I will attempt to arm you with a good understanding of intonation to help you get the best possible sound out of your guitar.
Building the Fretboard
First, let's get a bit technical. While you don't really need to understand fretboards in detail to get the gist of how intonation works, you might find this interesting.
Most guitars have frets. You've probably noticed that the frets on your guitar are not all the same distance apart from each other, and maybe you've even wondered how someone building a guitar would know where to put the frets so that every note rings at the perfect pitch. Or, at least, you may have assumed that every note rings at the perfect pitch. They don't, but we'll get to that later.
The simple answer to this question is: math. Your luthier starts by determining a scale length, which is the distance from the point where the string makes contact with the bridge saddle to the point where the string makes contact with the nut. In other words, how long is the vibrating portion of the string? That's the scale length, sort of. This is another point that we'll revisit later.
So, how long is the scale length supposed to be? It can actually be any length you want. There is no magic number that you must use. But by convention, you'll find that on an electric guitar it is usually one of either 24 ¾" (most Gibson style guitars) or approximately 25 ½" (most Fender style guitars). However, there are other variations. Paul Reed Smith, for instance, tends to use a 25" scale length, which may be an attempt to strike a balance between the Gibson and Fender styles.
Once you've chosen a scale length, you need to do math to determine the position of each fret. For those interested in the nitty gritty details, the formula for calculating the position of any fret is , where is the scale length and is the fret number you're calculating.
So, we've measured the scale length and calculated the fret positions, and now we have a guitar with frets that are perfectly positioned to ensure that our notes will ring at the perfect pitch, right? Well, if the frets could magically spring upward to touch the strings when we went to fret a note, that would be the case, but that's not how it works.
Bending the Strings
When playing guitar, you will sometimes play a note, and then bend the string to get a different note. A higher note. Because bending strings increases the tension and raises the pitch of the note being played. You probably already know that, but what you may not have thought about is that every time you fret a note, you also unintentionally bend the string just a little bit.
Imagine looking at the neck of your guitar–or actually look at the neck of your guitar, if you happen to have it handy while you're reading this–from the side with the nut on the left and the bridge on the right (or vice versa if you're a lefty), so you see the strings hovering above the frets. Each string forms a straight line from nut to bridge. Now push the string down toward any fret and see what you've done. Is it still a straight line from nut to bridge? No, it is a curved line that bends at the point where you're pressing on it.
What you have effectively done is bent the string slightly out of tune. If it's tuned to an E, you've now bent it to just slightly sharp of E. So, for example, while the position of the third fret is calculated to be at the point where an E string becomes a G, you're actually starting with a mildly sharpened E, which means you'll end up with a mildly sharpened G. So much for all that careful calculating and measuring your friendly luthier did while building the guitar in the first place.
Compromising Our Way to Perfection
The result is that we have a guitar that plays open strings in tune but plays fretted notes sharp. This is why we intonate. The theory is this: start with a scale length, such as 24 ¾". Position your frets based on that scale length. Then (and this is where it starts to get weird), move the bridge saddle a little bit further away from the 24 ¾" point so that you've now got a string that's longer than the intended scale length, and tune it to pitch. This is why earlier on I said that the scale length is sort of, but not quite, the length of the vibrating portion of the string. Because while 24 ¾" is the theoretical scale length, the actual length of the vibrating portion of the string will always be a bit longer than that.
Now, you have an interesting balance going on. Because your string is a tiny bit longer than it's supposed to be, the frets are no longer in the correct positions for that string. They're a little bit flat of where they should be for a string of that length. But, since you're going to bend the string a tiny bit sharp when you fret a note on it, the sharpening of the string due to bending compensates for the flatness of the fret position to result in a note that is sorta kinda almost the correct pitch. More or less.
If this sounds like an imprecise compromise, that's because it is. As much as it may seem like the guitar is a precise instrument, it's really a beautiful balancing act between precision and imperfection, a finely crafted machine with a whole bunch of compromises and “close enough" scenarios. And yet, almost surprisingly if you fully understand it, it works.
But then again, even the target we're aiming for is a compromise, thanks to the beauty of equal temperament. But that's a whole other fascinating topic I won't get into today.
Intonating, Step by Step
Enough about why we intonate. How is it done? Well, it's more art than science. You need a tuner. Or really, really, really good ears. I recommend a tuner. You also need a guitar with adjustable bridge saddles. And you'll need to know how to adjust the bridge saddles. I'm not going to go into detail about every type of bridge and how to intonate with it. I'll just share the high-level theory.
Start with your low E string. Play it open and tune it with your tuner. Really well. You want to start with a perfectly tuned (or as perfectly as possible) string. Now play the octave note at the 12th fret and see what your tuner says. Is it a little bit sharp? A little bit flat? Still in tune? If it's sharp, then you need to lengthen the string a bit by moving the saddle further away from the nut. If it's flat, then you need to shorten the string a bit by moving the saddle closer to the nut. Before you adjust the bridge saddle, it's a good idea to detune the string so that it's quite loose, make your adjustment, then tune it back up to pitch and try again. Keep doing this until the 12th fret is pretty close to being in tune when the open string is properly tuned, then move on to the next string.
Again, remember this is a compromise. Even if you get the octave note at the 12th fret perfectly in tune, that does not mean that you will have every single fretted note on the entire guitar tuned perfectly. That's because the distance between the top of the fret and the bottom of the string increases as you go up the fingerboard toward the bridge, which means that the amount of bend you apply when fretting is different for every fret. So, there is no “one perfect string length" that will work for every fret. What some technicians do is check the tuning on a few different notes and try to find the point that provides a reasonable balance of “close enough" for as many notes as possible. If you're not that patient, then just targeting the octave will suffice.
Giving it a Try
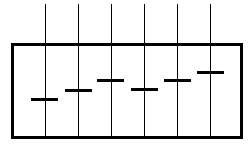
Now you understand what intonation is and why it's needed, and you know enough to give it a try on your own guitar, which I encourage you to do. There's a handy pattern that you can look for that will help you to know if you're on the right track. With a standard set of strings on a 6-string guitar you will have 3 plain strings and 3 wound strings. The general position of the bridge saddles when properly intonated will follow this pattern:
If you happen to use a heavier gauge of strings where the 3rd string (G) is wound, so that you have only 2 plain strings and 4 wound strings, the pattern will look like this:
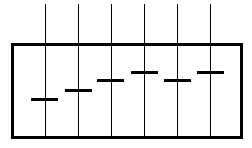
A bass guitar will follow the pattern of the 4 wound strings in the diagram above. You will need to experiment to find the exact correct position for each string on your particular guitar, but if it doesn't look somewhat like the expected pattern, then something has definitely gone wrong in your process. If you just can't seem to get it right, you may need to investigate other areas. Having the action set too high can cause intonation problems, as can having problems with your nut slots, or even having your pickups too high, which can cause the magnets to pull on the strings. When in doubt, take it to a professional. I strongly recommend asking that professional some questions about what they did to resolve the issue so that you can learn something. I think you'll find that most guitar techs and luthiers are happy to share their knowledge.
There are two key points that I'd like you to get from this article. First, your guitar isn't an incomprehensible mystery but the result of a delicate balance of precision craftsmanship and thoughtful compromise. And second, you can, with a bit of patience and practice, learn enough about your instrument to take good care of it and keep it sounding great.